The fifth battle in Len Tracey’s Malaya 1942 campaign. Again fought between Leith and John using Chain of Command. With major victories in the last 2 games, the Australians were hoping they had finally got the measure of the Japanese. But with the Japanese force bringing in a new platoon and a chance to roll higher than 1 for supports, nothing was being taken for granted.
JAPANESE PLATOON 4
With 3 losses and a minor victory to the Japanese so far in the campaign, this was to be the 4th platoon brought in by the Japanese against the tough Australian defenders.
- The 4th platoon was led by Rikugun (Lieutenant) Yamada and backed up by Gunsō (Sergeant) Baba.
- Rifle squad 1 was led by 29-year-old Gocho (Corporal) Sakakibara, a stone worker from Tadami.
- Rifle squad 2 was led by Gocho (Corporal) Miyazawa, a 25-year-old farmer from near Myoko.
- Rifle squad 3 was led by the reliable Gocho (Corporal) Jinnai of Takamatsu.
- Grenade discharger squad was led by the 30-year-old Gocho (Corporal) Kadokawa.
AUSTRALIAN PLATOON 1
The Australians continued with the platoon of Lieutenant Kenneth Reid and Sergeant Gary Turner. With the return of one man from hospital, the platoon was only 3 men short. I decided to have one man less per section.
The CO’s opinion of Lt. Reid had climbed to +4 in the campaign, which gave the Australian platoon +1 support in this battle. The men's opinion was at +3. Reid's outlook was superior. These gave him a total of +2 on the Force Morale role.
- Corporal Brian Evans continued to lead the 1st section
- Corporal Colin Moore continued to lead the 2nd section
- Corporal William Colling continued to lead the 3rd section.
MAP
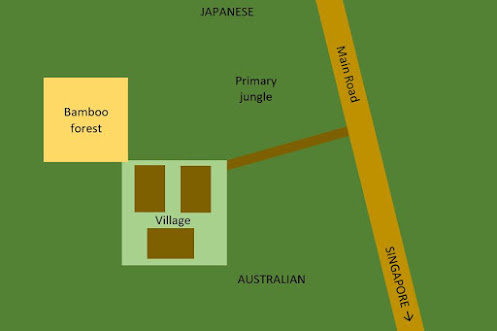
Like battles 3 and 4, this one was to be fought using scenario 2 from the Chain of Command rulebook. Because of the difficulties that the village and bamboo forest had posed in those battles, Leith decided to attack further west, while retaining use of the main road in case he could get a tank.
Because a third of the board was already defined (the 2 feet which included the main road) we decided to only roll for 2 instead of 3 additional terrain type in the primary jungle to the west of the road. Funnily enough, Leith rolled a village of 3 buildings and a bamboo forest. Placement was randomised into the western 4 feet of the board, resulting in the following map. A foot track was added to connect the village to the main road.
SUPPORT
Leith rolled a 6 for support, which finally gave him plenty of support options. It was likely that he would choose a tank. There were plenty of other options for him, especially as some of the supports cost less than usual for the Japanese in this campaign. This is a good representation of the Japanese preparedness for their Pacific campaigns. I would have to wait and see. Again we kept the support choices secret at the start.
The Australians gained 7 support points (3 from the difference between the two platoons, 1 from the CO’s opinion and 3 from half of the Japanese support). 8 support points would have been brilliant as I could have taken an additional section and a 2-pdr anti-tank gun. Tough choice with the 7. Anti-tank or extra infantry?
I decided to bring in an additional infantry section to stop the end run of the Japanese - since all the latter have to do is to get off the Australian edge of the board. I also brought a roadblock to stop the tank and an adjutant to help organise the forces behind the scenes.
FORCE MORALE
The continual battles with casualties were starting to wear down the spirits of the men. Despite both sides having positive adjustments, the Force Morale was 9 for the Australians and 8 for the Japanese. The low Japanese morale was good for the Australians. In the campaign the Japanese get a -1 on each “Bad Things Happen” roll, so it is more difficult for the Australians to drop the Japanese morale.
PATROL PHASE
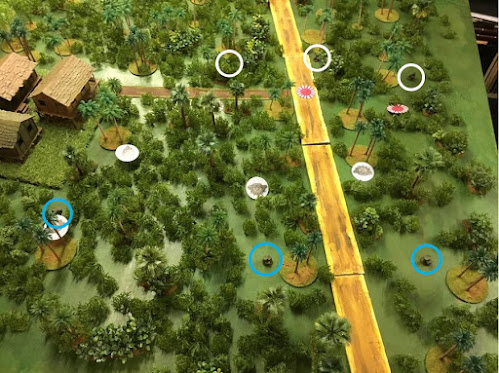
The Japanese commander decided to concentrate around the road, so he could get support from his tank. It also meant he could avoid the village and bamboo forest. A sensible, though obvious, approach which produced a very quick patrol phase.
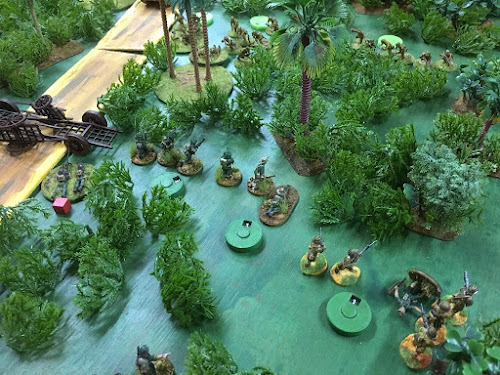
In the photo the white circles show the position of the Japanese jump-off points and the blue circles the Australian.
BATTLE
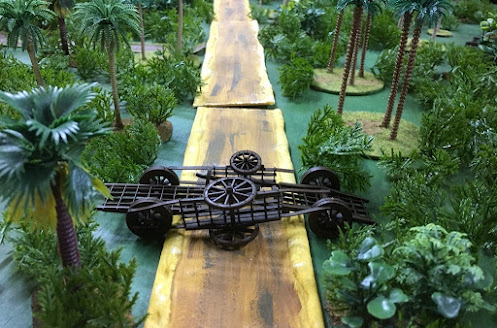
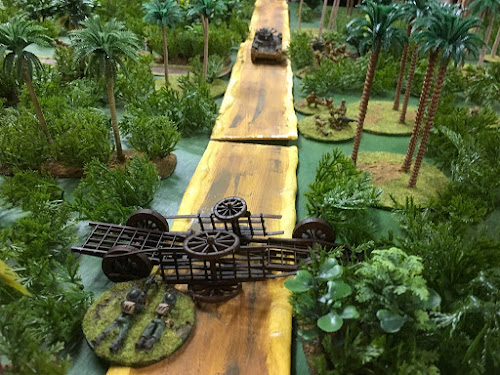
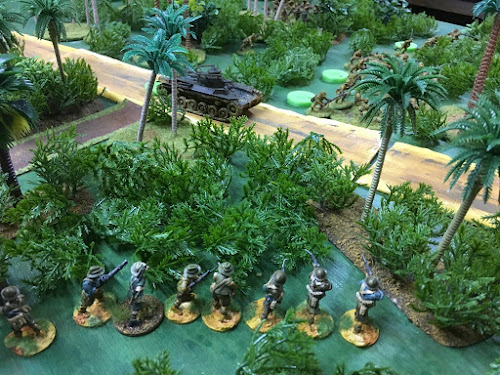
The Australian roadblock was deployed, to the surprise of the Japanese. With vehicles unable to make their way through the dense jungle, this stopped any tanks from driving down the road while the roadblock remained. An Engineer or Pioneer demolition team would be required to demolish it. However, with the rapid advance of the Japanese, their Engineer teams were not present on the battlefield.
Turn 1 Phase 1
- Command rolls began with a 1, 1, 2, 3, 6 for the Japanese. A good start to deployment with Leith able to bring in the Sakakibara’s 1st rifle squad, a medium machine gun and a Type 97 Chi-Ha medium tank. The ritual of “tanks going forth” had been a success. At least I knew what the Japanese support was, since all of it was now on the table.
- Despite only rolling 1, 1, 4, 4, 6 the Australians brought in their 1st section accompanied by Sergeant Gary Turner. They deployed east of the road to oppose the Japanese rifles and far enough from the road to gain protection from the tank.
- The opening salvo was effective from the Australians with 2 kills and 1 shock on the 1st rifle squad.
Turn 1 Phase 2
- A small straight to the Japanese for command of 1, 2, 3, 4, 5. The tank moved 10” flat out. Their 2nd rifle squad arrived at the edge of the track connecting the village to the main road. Their intent was to spread the Australian defence.
- Gunsō Baba rushed into the fray to stiffen the 1st rifle squad’s resolve, but his arrival must have distracted them as it did little for the accuracy of their fire. Private Allenby manning the Bren was initially shocked by this return fire.
- Countering with 2, 3, 3, 6, 6, allowed the Australians to bring in their 2nd and 3rd sections to protect the villagers and the flanking thrust of the Japanese. Fresh fire was effective, inflicting 2 kills and 1 shock on their opponents.
- But Gunsō Baba’s experienced showed as the 1st rifle squad made better use of cover; taking no effective hits. At least Corporal Brian Evans restored the Bren gunner Allenby’s poise when he drew a laugh with “How dare the bastards shoot back!”
Turn 1 Phase 3
- Back to back phases for the Australians due to the double 6 last phase. 2, 4, 4, 5, 6 was useful for command. Having an adjutant allowed young Lieutenant Kenneth Reid to arrive with the 4th section to aid Corporal Evans east of the road. Their total fire inflicted 1 kill on the 1st rifle squad.
- West of the road, the Australian 2nd section fired as the 3rd section moved forward tactically. The Japanese 2nd rifle squad now had 5 shock.
- Limited options in reply with 2, 2, 2, 5, 6 but it did allow Gunsō Baba to move within shouting range of the medium machine gun team. Facing two opponents the Japanese 2nd squad killed a rifleman and shocked the Bren team from the recently moving 3rd section.
Turn 1 Phase 4
- More devastating fire as the Australians made sure the village would not be entered by the Japanese 2nd squad. 3 more kills and now up to 7 shock.
- With the rest of the 1, 3, 4, 5, 5 Brian Evans moved his section carefully forward to get the Thompson sub-machine gun within range (12”). Whilst covering them the 4th section added 2 kills to the enemy 1st squad.
- Worryingly for the Australians, the Japanese were beginning to organise their forces. Command of 1, 1, 2, 3, 4 allowed the medium machine gun to move 8” forward and the tank to rattle 16” down the road.
- The 3rd rifle squad deployed next to the tank. The grenade discharger squad arrived and began seeking out targets.
- Ineffective fire from the Japanese overall this phase. But with them effectively massing, was this the calm before the storm?
Turn 1 Phase 5
- Turn 1 ended after this phase with the Australian command roll of 1, 5, 6 ,6, 6. No effect from the turn ending. The only activation was a Bren team firing at the 2nd Japanese rifle squad. Highlighting the accuracy of the Bren, their 3 hits added 2 kills and 1 shock, pinning the Japanese. Interesting how sometimes you get a better result from just a few hits.
Turn 2 Phase 1
- Well! An interesting roll. A 5, 5, 6, 6, 6 to the Australians ended the turn again. Always useful completing a Chain of Command die, but I think I would have preferred the opportunity to pour more fire into the enemy squads.
- On the bright side, worried about the tank, I used my newly completed Chain of Command die to ambush with the Boys anti-tank rifle. Ambushing allows you to bring on the team, fire and then disappear again. Very useful with such a fragile team.
- Successfully sighted the tank, but unfortunately no hits. Never mind, worth a try.
Turn 3 Phase 1
- The Australian phase again. Amazingly a 1, 1, 3, 6, 6 meant yet another phase to the Australians after this one.
- The 3rd section moved tactically towards the pinned squad and wounded Gocho Miyazawa, dropping his command points to 1. The squad did not like that, which resulted in a drop of 1 for the Japanese Force Morale.
- The Boys came on for good this time, manning the barricade and getting protection from the jungle. More successful after the previous sighting shot, they caused 1 nett hit, adding a shock and damaging the gun sight.
Turn 3 Phase 2
- More fire onto the beleaguered Japanese 2nd squad with 1 kill and more shock, bringing them down to 6 men (including the leader) with 11 shock. Only 1 shock or 1 kill needed to make them break.
- Lieutenant Reid’s command roll of 3, 3, 4, 5, 6 allowed him to move closer to his men. He ordered his 4th section to move tactically forward. Their fire added 1 shock to the medium machine gun and 2 shock to the 3rd rifle squad.
- He also ordered the Boys to fire again. A glancing blow clanged ineffectually off the tank’s armour.
- Leith was pleased that the Japanese finally got to do quite a lot with a command roll of 2, 2, 3, 4, 6. Rikugun Yamada, the platoon leader, arrived to direct the massing troops.
- Fire from the MMG killed a Bren loader in the 4th section and added a shock to the 1st section rifle team. Unable to deploy properly the 3rd rifle squad did little (they only managed a tactical move of 1” whilst their fire had no effect as the rest of the squad was strung out behind the LMG and one rifleman).
- Gunsō Baba activated the 1st rifle squad and the mortar discharge squad to no avail.
- The tank opened up with the turret machine gun – only managing to damage some jungle plants. If they started rolling well, it was possible for the machine guns to inflict heavy casualties. This would be a real worry for the Australians since they had to carry this platoon throughout the campaign.
Turn 3 Phase 3
- Command of 1, 3, 3, 4, 5 allowed the Boys to fire again. On target. 2 hits versus 2 saves unfortunately gave no effect on the vehicle “Equal Hits and Saves” table.
- It was the turn of the Australian 3rd section to move forward and fire at the pinned Japanese. 5 hits resulted in the 1 shock needed to break their enemy. The Japanese raced back 15” away from the carnage.
- The Japanese commander must have been concerned about his right flank disappearing – the Force Morale dropped to 5. Only one more drop would see the reduction of Japanese command dice.
- Other Australian fire successfully inflicted 1 kill and 1 shock to the MMG, 2 kills to the 3rd rifle squad and 1 kill for the 1st rifle squad.
- The 2nd section now moved towards the road to aid the Australian right flank. Unfortunately, the difficulty of looking across the sun-drenched main road into the jungle beyond meant that they were just short of being able to fire onto the flank of the Japanese MMG.
Initially we mistakenly allowed them to fire at the MMG. It caused the death of the Junior Leader and the loss of a Force Morale point. This put Leith down to 4 command dice, which he rolled. He debated about pulling out, but was still in a good position, so he pressed on. But as he started activating his troops, something about the intervening main road had me check the visibility rules.
Now it is actually quite difficult to see out of the shadows of a wood, across an open area and into the shadows of another wood. And the brighter the open area, the more difficult it is.
In the main rules you can see out of woods into the open when within 4” of the edge and light orchards within 6” of the edge. This is also how far you can see into these terrain types if looking from outside. Inside to inside is 12” for woods and 18” for light orchards.
Len Tracey has defined various types of terrain for the Pacific. For primary jungle, he has visibility inside to inside to be variable. Each time you need to check for visibility it will be 12” + 1D6” (giving (13” to 18”). So the jungle visibility varies between wood and open orchard.
To match this, we decided that to see out of or into primary jungle the unit must be within 4” to 6” of the edge. Use 3” + 1D3” each time you need to check.
This applies to a road through the jungle. We defined a road as wide enough to create a break in the canopy. So to check visibility across the road you would need to roll both for the observing unit (is it within 4” to 6” of the edge) and the target unit (is it within 4” to 6” of the jungle on the far side of the road.
It does not apply to a track. We defined a track as not wide enough to break the canopy. Thus it still gets filtered light like the surrounding jungle and so the normal inside to inside jungle visibility applies across a jungle track.
So even though the Japanese MMG was less than 12” away, the Australians were just over 6” from the edge of the road. So we undid the fire on the MMG. Leith got his Junior Leader and Force Morale point back. I got him to roll his 5th command die to the four he had already rolled, and on he went.
- The Japanese were now starting to find their enemy, inflicting 4 shock across the Australian right half, including one on the Boys team. With a crew of only two, I would have to remove this as soon as possible.
- And their command of 2, 3, 5, 6, 6 meant no letting up of pressure on the men from down under. Of course you’ll guess that the late fifth command die rolled a 6.
Turn 3 Phase 4
- The Japanese command roll of 1 ,3, 5, 5, 5 now swung a finely balanced game just in favour of the Japanese. Leith used the new Chain of Command die to move the threatened Jump-off Point across the main road – out of reach.
- Their 3rd squad was able to improve their position, using a 4” tactical move to bring more men to bear on the Australian right flank.
- Fire from the Japanese gun line placed killed the Boys loader plus a rifleman from the 4th section. The Bren team of the latter took 1 shock. Worse was the knocking out of Corporal Brian Evans, although it went unnoticed due to the fierce firefight that had erupted in this part of the jungle.
- The Australian right flank was beginning to look very fragile. The last couple of phases had added shock to each team. A few kills had put several of the teams close to being pinned.
- With a 1, 2, 3, 3, 5 the Australians removed some shock. Their fire put 2 shock on the Japanese 1st rifle squad and a kill on the 3rd rifle squad.
- Now warming up, the Boys penetrated the turret of the tank. A good blow which inflicted 2 nett hits – adding 2 shock and killing the unfortunate gunner. It would take 2 phases to move another crewman to this important position. With 3 total shock, the crew was close to bailing out. Leith was relieved that he had removed a shock from the tank in a recent phase.
- But with the importance of removing the shock from the right flank, the Australian left flank was unable to move into firing range to come to the aid of their mates.
Turn 3 Phase 5
- With a rat-a-tat-tat and a 1, 2, 3, 5, 6 the impressive Japanese firing line finally inflicted the casualties they had been anticipating for a while. 3 kills on the rifle team of the Australian 1st section plus 2 kills and a shock on the 4th section.
- Lieutenant Reid could feel the battle slipping away. A clear victory had been so close a short time ago. Should he retreat? But if he could just put another shock onto the tank the crew would bail out and “Bad Things” might happen to the Japanese. If he could also move his 3rd section just an inch, he had a good chance of knocking out the medium machine gun.
- With the rare prospect of replacements looming if they lost this battle, it was worth one more throw of the dice for the Aussies.
- A 2, 3, 3, 3, 5 was very disappointing. Chain of Command points went to 4. Tantalisingly close, but not close enough. A Chain of Command die would be used to end the turn. That would rout the broken rifle squad and force a “Bad Things Happen” roll for their Junior Leader routing. It would also make Corporal Brian Evans conscious again, probably speeding up the removal of shock.
- Not rolling a 1 or not rolling a 4 was very bad. I could not remove much shock. But worse was that I could not fire the Boys. So no chance to shock the tank.
- The limited fire only inflicted 1 shock on the 3rd squad.
- The Australian 3rd section moved 2d6 toward the road. The 2nd section moved tactically towards the chattering sound of the medium machine gun. They fired on the dangerous gun, but could not repeat their previous effort. No effect this round, but at least now they could clearly observe the machine gun.
Turn 3 Phase 6
- The Japanese command roll of 1, 1, 3, 4, 6 allowed them to bolster the courage of the tank crew. Although dropping 1 shock reduced the risk to the tank, the hull machine gun failed to hit anything.
- But the rest of the Japanese improved on this with some withering fire on the Australians.
- The Boys gunner was killed, wiping out the team and completely removing the threat to the tank. Corporal Brian Evans was knocked out again. All this dropped the Australian Force morale by 3, so it was now down to 6.
- A kill and a shock on the 4th section had them dangerously close to being pinned. A kill on the rifle team of the 1st section further discomforted that section.
- Clearly time for the Australians to withdraw.
WRAP UP
A wonderfully close game. Leith and I both enjoyed it immensely. So tense, with it swinging backwards and forwards between the Australians and the Japanese. Leith had certainly pulled a victory from the jaws of defeat.
A fresh platoon and a roll of 6 for supports certainly helped Leith, but it was far from a foregone conclusion.
Perhaps if I had saved the Chain of Command die just a phase or two and used it to end the turn it would have routed the broken squad and led to an Australian victory. But if I had damaged or destroyed the tank with the Boys ambush, using the Chain of Command die for that would have been a good call.
Or if the Australian 2nd section had been 1” closer, the death of the MMG Junior Leader would have stood and the Japanese would have been rolling fewer command dice. No double phase for them, so maybe I would have avoided the round of death.
Although if Leith’s troops had shot more accurately earlier on, the result may still have been a Japanese victory, but perhaps earlier and more comprehensive.
Would it have been any better if I had chosen the support of a 2-pdr anti-tank gun instead of the 4th infantry section? Maybe I would have knocked out the tank. But then I may not have gained the upper hand in the battle to protect the village using only 1 section against 1 squad. And I was so close to taking out a jump-off point.
Just shows how close a game is, when there are so many little things that could have tipped the balance one way or the other. Chatting about the what-ifs afterwards is great fun!
CAMPAIGN IMPACT
With 50% more casualties than the Australians, it ended as a minor victory to the Japanese. But a victory is a victory and they finally get to move forward to map 3.
Rikugun Yamada will lead his platoon again against the Australians. He has improved from happy to secure, especially with the knowledge that his commanding officer’s opinion has moved to +1. The men’s opinion has dropped to -2 though, due to the high casualties. The butcher’s bill was 16 casualties on the core platoon, plus 1 machine gunner and the tank gunner out of the supports.
From the core Japanese platoon, 8 are out of the campaign for good, 4 will miss the next battle and 4 return straight away. No additional men were recovered from the battlefield. Rolling a 6 means Leith will get 8 replacements. So he will be down 4 men, but at least no leaders out this time.
The calculation for replacements in “At the Sharp End” gave a maximum result of 10, although cannot take the platoon over-strength. In the earlier games we allowed men recovering (out for just 1 battle) to be replaced. But that seemed messy as you may end up over-strength next time if a lot of men returned from their recovery and few casualties had been lost in the last battle. Checking with the helpful folk on the TooFatLardies Chain of Command forum resulted in us now including the recovering men in the platoon strength. Thus 10 becomes 8, replacing those out of the campaign for good.
The CO’s opinion of Lt. Kenneth Reid stayed at +4, whilst his own outlook stayed at superior. The men's opinion slid back to +2. They don’t like losing.
The Australians lost 7 from their core platoon, including the Boys anti-tank Team, plus 5 from the supporting 4th section. From the core Australian platoon for this battle, 3 are out of the campaign for good, 2 will miss the next battle and 2 return straight away.
Corporal Brian Evans was going to miss the next battle, needing to recover from his concussion, as he was knocked out twice. William “Billy” Brewer from the 1st section was promoted to Acting Corporal as his replacement.
The platoon now had 6 out of the campaign. Due to winning some of the previous battles, the Australians get replacements before the first game on map 3. This is the first of only two occasions when they can. With the CO’s opinion of +4 and rolling a 3, the Australians were able to replace up to 8, but this cannot take the platoon overstrength, so all 6 were able to be replaced. Men recovering for a battle are still counted in the platoon strength. So the Australians will fight the next battle missing just the 3 recovering (2 Privates plus Corporal Brian Evans).






Is the 1942 Australian list the same as the British list of the same time-frame? Is the Boys Rifle team organic to the platoon, or did you purchase it as a support? For most early war British lists, both the Boys team and 2" mortar team are organic, which (unfortunately for the Australians) would mean more troops lost to your core platoon this battle (7 instead of 5, meaning losses of 3, 2, and 2 as opposed to 2, 2, and 1). As the campaign goes on, every man lost is going to be felt more keenly by the Australians.
ReplyDeleteMark, you are correct. Thanks for spotting that. They are integral. I shall adjust the write-up. I was getting confused with a recent battle where I purchased a second Boys AT team. At least in this instance it won’t be so bad because it is almost the only time I get replacements. It will matter more in future.
DeleteCheers,
John
Great AAR and a tense game. Very keen to give this campaign a go.
ReplyDelete